How To Deploy Portainer in Kubernetes With Traefik Ingress Controller
Streamline Kubernetes Management with Portainer and Traefik Ingress Controller
Introduction
This tutorial will show how to deploy Portainer (Business Edition) with Traefik as an Ingress Controller in Kubernetes (or k8s) to manage installed Service.
To follow this tutorial you need the following:
- A running Kubernetes cluster or a Managed Kubernetes running a Traefik Ingress Controller (see this tutorial)
- A PRIMARY_DOMAIN
PRIMARY_DOMAIN, please change accordingly. If your desired domain ispaulsblog.dev, replacePRIMARY_DOMAINwithpaulsblog.dev.Prerequisite
Installing Helm, Kubernetes Package Manager
Helm is the primarily used Package manager for our Kubernetes cluster. We can use the official Helm installer script to automatically install the latest version.
To download the script and execute it locally we run the following command:
curl -fsSL -o get_helm.sh https://raw.githubusercontent.com/helm/helm/main/scripts/get-helm-3
chmod 700 get_helm.sh
./get_helm.sh
Configure kubectl To Access The Kubernetes Cluster
To access our Kubernetes cluster we have to use kubectl and supply a kubeconfig file which we can download from our provider. Then we can store our kubecfonig in the KUBECONFIG environment variable to enable the configuration for all following commands:
export KUBECONFIG=yourconfigfile
kubectl get pods
kubectl get all
Alternatively, we can install "Lens - The Kubernetes IDE" from https://k8slens.dev/. I would recommend working with Lens!
A default Storage Class
Running Portainer on Kubernetes needs data persistence to store user data and other important information. During installation using Helm Portainer will automatically use the default storage class from our Kubernetes cluster.
To list all storage classes in our Kubernetes cluster and identify the default we execute kubectl get sc:
 ╰─λ kubectl get sc
NAME                              PROVISIONER                RECLAIMPOLICY   VOLUMEBINDINGMODE   ALLOWVOLUMEEXPANSION   AGE
csi-cinder-classic                cinder.csi.openstack.org   Delete          Immediate           true                   113d
csi-cinder-high-speed (default)   cinder.csi.openstack.org   Delete          Immediate           true                   112d
The default storage class is marked with (default) after its name.
As I (or we) don't want to use csi-cinder-high-speed I switch the default storage class by executing the following command:
kubectl patch storageclass csi-cinder-classic -p '{"metadata": {"annotations":{"storageclass.kubernetes.io/is-default-class":"true"}}}'It is also possible to use the following parameter while installing with Helm:
--set persistence.storageClass=csi-cinder-classicDeploy Portainer Using Helm
We will deploy Portainer in our Kubernetes cluster with Helm. To install with Helm we have to add the Portainer Helm repository:
helm repo add portainer https://portainer.github.io/k8s/
helm repo update
After the update finishes we will install Portainer and expose it via NodePort because we utilize Traefik to proxy requests to a URL and generate an SSL certificate:
helm upgrade --install --create-namespace -n portainer portainer portainer/portainer --set enterpriseEdition.enabled=trueWith this command, Portainer will be installed with default values.
If you do not want to use the Enterprise edition you should disable it by using
--set enterpriseEdition.enabled=falseAfter some seconds we should see the following output:
Release "portainer" does not exist. Installing it now.
NAME: portainer
LAST DEPLOYED: Wed Jul  3 11:34:57 2024
NAMESPACE: portainer
STATUS: deployed
REVISION: 1
NOTES:
Get the application URL by running these commands:
    export NODE_PORT=$(kubectl get --namespace portainer -o jsonpath="{.spec.ports[1].nodePort}" services portainer)
  export NODE_IP=$(kubectl get nodes --namespace portainer -o jsonpath="{.items[0].status.addresses[0].address}")
  echo https://$NODE_IP:$NODE_PORT
If you are using Lens you can now select the Pod and scroll down to the Ports section to forward the 9000/TCP port to your local machine:
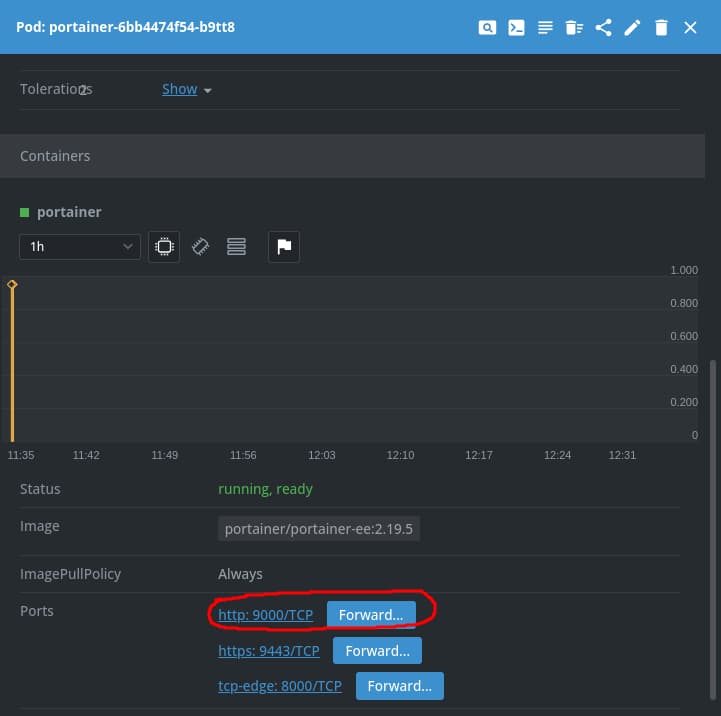
Press Forward and enter a Port to access the Portainer instance in your browser to test Portainer before creating the Deployment:
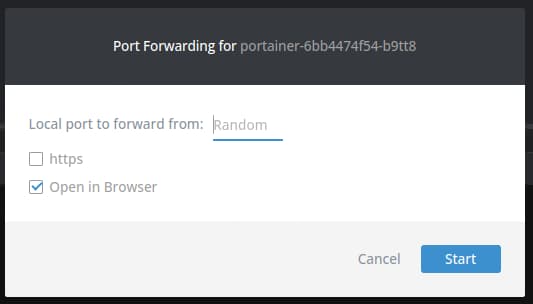
Press Start and a new browser window will open showing the initial registration screen for Portainer in which we can insert the first user:

After the Form is filled out and the button Create user is pressed, we successfully created our Administrator user and Portainer is ready to use. If you have installed the business edition you should now insert your License Key which we got from following the registration process on the Portainer website.
Adding An IngressRoute For Portainer Access
To make Portainer available with an URL and a SSL certificate within the WWW we have to add an IngressRoute for Traefik.
The IngressRoute will contain the service name, the port Portainer is using, and the URL on which Portainer can be accessed.
---
apiVersion: traefik.io/v1alpha1
kind: IngressRoute
metadata:
  name: portainer-dashboard
  namespace: portainer

spec:
  entryPoints:
    - websecure

  routes:
    - match: Host(`portainer.paulsblog.dev`)
      kind: Rule
      services:
        - name: portainer
port: 9000apiVersion is different. For Traefik v2 use: traefik.containo.us/v1alpha1We should save (and maybe adjust) this code snippet as ingress-route.yaml and apply it to our Kubernetes cluster by executing:
kubectl apply -f ingress-route.yaml -n portainerClosing Notes
Congratulations! We have reached the end of this short tutorial!
I hope this article gave you a quick and neat overview of how to set up Portainer in your Kubernetes cluster using Traefik Proxy as an Ingress Controller.
I would love to hear your feedback about this tutorial. Furthermore, if you already used Portainer in Kubernetes with Traefik and use a different approach please comment here and explain what you have done differently. Also, if you have any questions, please ask them in the comments. I try to answer them if possible.
Feel free to connect with me on Medium, LinkedIn, Twitter, and GitHub.
Thank you for reading, and happy deploying!
🙌 Support this content
If you like this content, please consider supporting me. You can share it on social media, buy me a coffee, or become a paid member. Any support helps.
See the contribute page for all (free or paid) ways to say thank you!
Thanks! 🥰